I needed to have form submissions on our company website make their way directly into the EspoCrm system. The website is running Elementor, which has it’s own forms. This post outlines the steps taken on both systems, as well as the helper program to bring it all together.
EspoCrm
Investigating the best method on the EspoCrm side, the easiest approach looked like using the Web-to-Lead feature. Creating Contacts directly via general api calls, while feasible, looked more complicated, and messing with core espocrm php files, something we’re trying to avoid.
The first step is to create an Entry Point. The Entry Point creates a ready-to-use REST api, which when called will create a Lead.
Go to Administration, Lead Capture, then Create Entry Point.
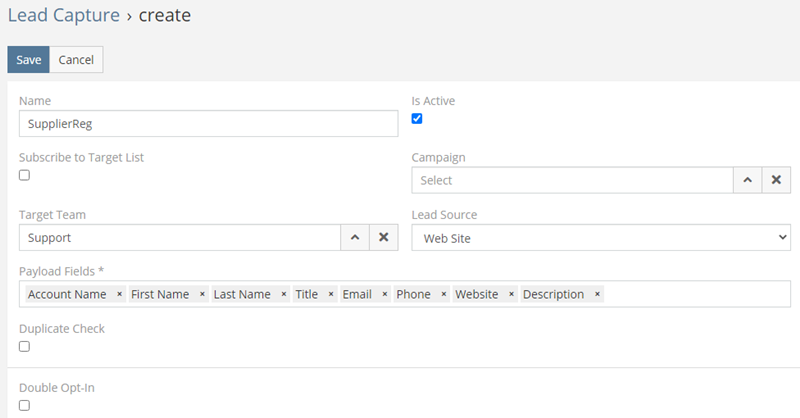
Set the Name for your entry point, set the Team to assign. Enter the Payload Fields you want set on the Lead.
In our use case, there was no need to assign to a Campaign or Target List, so both the Subscribe options are turned off. In our use case, web form submissions will be reviewed as Leads, and converted to Contacts from within EspoCrm, and associated with the appropriate Account.
Click Save. This creates the Entry Point, with unique Api Key, Url, and associated json payload format.
It’s helpful to test this standalone, and confirm you can create a Lead via this Api call. I used REQBIN for this. Enter the Url generated for your Entry Point, choose the method as POST. For payload, choose “JSON (application/json)”, and then paste your payload text in the box below. Depending on your payload fields, it will look something like this:
{
    "accountName": "MyTestAccountName",
    "firstName": "John",
    "lastName": "Doe",
    "title": "Title",
    "emailAddress": "john.doe@example.com",
    "phoneNumber": "123-555-1212",
    "website": "www.example.com",
    "description": "Some descripton text"
}
Click Send. You should get a Status 200 (OK) message on screen.
Now go to EspoCrm, choose Leads, and confirm your lead got created.
Now we’re ready to switch to the WordPress side.
Elementor Form Webhook Structure
We’ll be utilizing a webhook in the form Action After Submit to capture the form fields. While there are a number of stock integrations in Elementor, there is no documentation on the webhook payload. So first we need to decipher it. I used Webhook.site to receive the incoming request and provide a comprehensive dump of the structure. When you go to the site, you’ll get a unique url you can use to test. It will look something like https://webhook.site/#!/9e178c80-cc14-43ef-ad53-86c8c0a68b72.
Configure your Elementor form- choose Actions After Submit, and add webhook to the list of actions. You’ll see a Webhook section appear below. In the Webhook URL field, paste the webhook.site url. Set Advanced Data to Yes. Publish the site page so you can try it out.
Go to your website, fill out the form, and submit it. Go to the webhook.site page and view what was submitted.
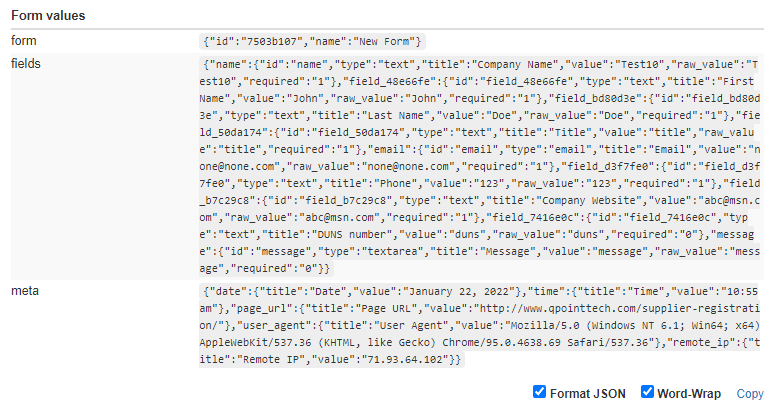
webhook.site
It is a json payload with 3 parameters, with the form information in the fields parameter.
fields is an array of arrays, with the number of elements corresponding to the number of form entries. Each element contains the following subarray elements: id, type, title, value, raw_value, required. The “value” field contains the form field value that was entered.
Some of my field names had identifiers instead of human readable names, e.g. “field_48e66fe”. To set nice names for all the fields, in the form, click on the field, choose Advanced, and set the ID.
Now the form payload structure is known, time to proceed to the next step.
Php webhook Handler
I decided to create a php program as the recipient of the webhook call, and locate it on our WordPress site. We already have a folder created to manage landing pages, redirects, and custom handling with php, so this seemed like the easiest approach. This program receives the Elementor form payload, prepares the payload format required by EspoCrm, and calls the Entry Point.
In the EspoCrm developer documentation at Developer Documentation, there is a helper class EspoApiClient that I utilize. Do the following:
- Copy the code to the clipboard
- In the same directory as the php program below, create the new file espocrmlib.php
- Paste the code in the file
- At the end of the file, enter the closing php tag “?>”
And here’s the code for the form handler:
<?php #
/*  crm-create-lead.php
  Called by wordpress form with user submit info. This data is then written to EspoCrm via the Entry Point api call,
  which creates it as a Lead in crm.

  Inputs:
    $_POST - an array, containing entries for form, fields, meta
    $_POST[form] - name (name of wp form, e.g. Supplier Registration), id (wp form id)
      [id] => 7503b107
      [name] => Supplier Registration

    $_POST[fields] - the form fields. Contains an array, with keys company, first_name, last_name, title, email, website, duns, message.
      Each element of the form (we just use value):
      'id' => the form field ID you set in Elementor
      'type' => the type of field (text, email etc.)
      'title' => the label for the field
      'value' => the actual value in the input element
      'raw_value' => not sure how this differs from 'value'...
      'required' => whether the field was marked as required.

    $_POST[meta]
*/

/* Process the parameters, format them for espoCrm and place in json array.
    EspoCrm api call payload for Lead is of the form:
    {
        "accountName": "The Company Name",
        "firstName": "John",
        "lastName": "Doe",
        "title": "Job Title",
        "emailAddress": "john.doe@example.com",
        "phoneNumber": "650-555-1212",
        "website": "www.example.com",
        "description": "Some Message"
    }
*/
$FormFields= &$_POST['fields'];   // Reference

/* Form Ids set in wp form: company, first_name, last_name, title, email, website, duns, message
   These are keys in the array.
*/
$FormDescription= 'Registration from website. ' .  $FormFields['message']['value'] . ' DUNS: ' . $FormFields['duns']['value'];
$FormData=
[
  'accountName' => $FormFields['company']['value'],
  'firstName'   => $FormFields['first_name']['value'],
  'lastName'    => $FormFields['last_name']['value'],
  'title'       => $FormFields['title']['value'],
  'emailAddress' => $FormFields['email']['value'],
  'phoneNumber' => $FormFields['phone']['value'],
  'website'     => $FormFields['website']['value'],
  'description' => $FormDescription
];

/* Perform the api call.
  e.g. http://www.example.com/api/v1/LeadCapture/01234567890123456789012

  Refer to
    https://docs.espocrm.com/administration/web-to-lead/#php
*/
$FormId= $_POST['form']['id'];
// Set api key as defined in Crm for this entry point.
$ApiKey= '12345';
if ($FormId == '7503b107')
{ // Supplier Registration
  $ApiKey= '01234567890123456789012';
}
else
{ // Invalid Form
   exit();           // Quit the script.
}

/*  EspoApiClient class definition.
    Paths are always relative to the initial script's location, even if the parser is going through an include that resides in a different directory.
    As include file is in the same dir, no path needed.
*/
require_once('espocrmlib.php');

$CrmUrl= 'http://www.example.com:8080';
$client = new EspoApiClient($CrmUrl);
$client->request('POST', 'LeadCapture/' . $ApiKey, $FormData);
exit();           // Quit the script.
?>
Final Elementor Form
Now set the webhook to to this program. Go to the Elementor form, in the Webhook URL field, enter the full url to crm-create-lead.php. Note that you cannot use relative paths, it needs to be the full http or https path.
Now test filling out your form and confirm the Lead is created in EspoCrm.